Debugging & Testing
Debugging Options
- Add print statements to the node files:
log.Println()for Golang nodes. Note that you need to addlog "github.com/sirupsen/logrus"to the import list.logging.Info()for Python nodes. Note, you need to addimport loggingto the top of the file. Theprint()function in Python does not work well in parallel.
- Run a node independently in a debugger
- Use the --trace <fields> option on the vor run command.
Using the --trace <fields> option, select one or more fields used in a process. The selected fields would be traced for 10 observations. Tracing will produce a trace.csv file in the output/<jobID>/trace directory with the following form:
order,obs,thread,node,queue,fieldName,...
1,1,1,firstNode,input,NaN
2,2,1,firstNode,input,1.5
3,3,1,firstNode,input,-14
4,1,1,secondNode,output,NaN
5,4,1,firstNode,input,56
6,2,1,secondNode, output,1.5
...
Where:
- order is basically a timestamp of when the field was processed. This is a useful column for sorting. For example sort by obs and order to get a sequence of values for each observation.
- obs is the observation number for the named queue. The observation number may not correspond across nodes/queues.
- thread is the thread number for the node feeding the queue. It would be useful for the user to disable threading for more clarity in the trace.
- node is the name of the node that is the source of the value.
- queue is the name of the queue the field was observed on.
- fieldName is the value of the field as observed in the queue. When multiple fields are selected, <NA> will indicate the field is not present in the current queue.
Note: any field longer than 100 chars will be truncated.
Generating Test Data
Testing nodes and processes is an important and efficient activity in VOR Stream. The vor generate command was created to make generating test data easy, both as input data to a process, and input data for testing nodes individually.
By default, vor generate produces very bland data. If you are creating demo data or testing specific features like missing values, vor generate can use a format specification for field names. The format specification is placed in the genFormat field of the data dictionary, dictionary.csv. Format is one of the following:
| Format | Description | Allowed Field type | Example output |
|---|---|---|---|
| Percent | Generates a number between 0.01 and 100. | num | 99.5, 88.87 |
| Prob | Generates a number in [0,1) | num | .55555, .922 |
| currencySmall | Generate a number with two decimal places between 0 and 10,000 | num | 199.52 |
| currencyMedium | Generate a number with two decimal places between 0 and 1,000,000 | num | 1000.50 |
| currencyBig | Generate a number with two decimal places between 0 and 100,000,000 | num | 20,223,423.56 |
| missingN | Generates missing values/NaNs | num | NaN |
| Int | Generate positive integers [0,1000). This is for the int variable type. | int | 247 |
| City | Generates city names from the US. This is coupled with the state format so city and state match up. | char | Tampa, Raleigh |
| State | Generates state names from the US. This is coupled with the city format so city and state match up. | char | Florida, North Carolina |
| Region | Generates one of the five regions of the US. | char | Midwest |
| Continent | Generate a name of a continent. This is coupled with the Country format so continent and country match up. | char | Asia |
| Country | Generate a name of a country. This is coupled with the Continent format so continent and country match up. | char | Albania |
| list string1@string2@string3 | Generate strings from a list. Items can be repeated in the list to increase the frequency that they show up in the data | char | String1 |
| list [email protected]@3.5 | Generate numbers from a list | num | 2.5 |
| list -1@2@3 | Generate integers from a list | int | -1 |
| list true@true@false | Generate a boolean from a list | bool | true |
| list 2020-01-01@2021-01-01@2022-01-01 | Generate a date from a list | date | 2020-01-01 |
| LOB | Generate a line of business for a bank. | char | Commercial Lending |
| name | Generate a name of a person. | char | Olive Yew |
| color | Generate a color | char | scarlet |
| companyFake | Generate a fictional company name | char | Polly Pipe |
| stock | Generate a stock ticker from the S&P 500. This is linked to the company and sector formats. | char | ABT |
| company | Generate a real company name from the S&P 500. This is linked to the stock and sector formats. | char | Abbott Laboratories |
| sector | Generate a sector from the S&P 500. This is linked to the company and stock formats. | char | Health Care |
| stringSmall | Generate a 16 character string | char | |
| stringMedium | Generate a 64 character string | char | |
| stringBig | Generate a 256 character string | char | |
| missingC | Generate a blank | char | |
| sequence | Uses the name of the field and adds a sequential numeric suffix | char | Instid1, instid2, instid3, … |
| sequencen | Produce a numeric sequence starting with 0 | int | 0, 1, 2, 3 … |
| dateFuture | Generate a date in the coming year. | date | |
| dateFarFuture | Generate a date in the next ten years. | date | |
| datePast | Generate a date in the past year. | date | |
| dateFarPast | Generate a date in the past ten years. | date | |
| datetime | Generate a datetime variable value. | datetime | |
| uniform min max <num decimals> | Generate numbers uniformly distributed between two numbers. The optional number of decimals is an integer between 0-10 (10 is the default) that specifies the number of digits preserved after the decimal point. | num | 5 |
The order of the fields in the generated data is determined by the order the fields appear in the dictionary.csv file.
To generate sample data for a table named mine use the following command:
vor generate mine
This will use the definition of the table to generate valid data to load as a CSV input. The output will be placed in the <playpen>/input directory and be called mine.csv. By default, 100 observations will be produced. To change how much data is produced, use the --nobs <int> option. If the file already exists, the file will not be overwritten unless you use the -f, force option.
To create JSON input for individual node testing, use the --json option. This creates files in the <playpen>/test directory with the extension, .json. You can change the output file name by using the -o <name> option. You can change the seed used in the random number generator by specifying the --seed <int> option.
| Options | Description |
|---|---|
| -f | Forces the program to overwrite the already existing file |
| --json | Create data in <playpen>/test directory with the extension, .json. Otherwise, the data is created in the input directory as a CSV |
| --nobs <int> | Specifies the number of observations to create (default 100) |
| -o <name> | Change output table name (default <table>.csv or <table>.json) |
| --seed <int> | Change the seed used in the random number generator |
| --test | Allows you to provide a quoted, comma separated list of nodes to test/debug |
End-to-End Process Tests
VOR Stream has builtin capabilities to perform End-to-End (E2E) testing of a process. E2E testing is performed in a playpen and run on one or more stream files. The stream files should be in the src directory of the playpen. In the src directory create a JSON file called tests.json with the following form:
[
{
"streamfile": "<stream-file-name>",
"logsToComp": [
"<log-file-1>", "<log-file-2>", ...
],
"ResultsToComp": [
{
"name": "<output>.csv",
"ignore": [
"<column-name-1>", "<column-name-2>", ...
],
"significance": 4,
"ids": [
"<column-name-1>", "<column-name-2>", ...
]
}
],
"WantCreateProcessError": false,
"JobOptionsFile" : "Optional joboptions in src directory"
}
]
tests.json contains a list of one or more stream files to test. It has the
following rules:
- The stream file name must be the same as the process name.
- The stream files must be in the source directory.
Below are descriptions of the fields for a test suite entry in the JSON file. Field names are case-insensitive, so the casing used in existing fixtures may vary:
streamfile: The name of the stream file to test.logsToComp: A list of log files to compare. This is optional.WantCreateProcessError: A Boolean indicating whether the process creation is expected to fail. This is optional. By default, process creation is expected to succeed.joboptionsFile: Name of a job options file in thesrcdirectory to use with the current test. This is optional.ResultsToComp: A list of output CSV files to compare. This is optional.name: The name of the CSV file to compare.ignore: A list of columns to ignore in the comparison. This is optional.significance: The number of significant digits to compare. Only applies to numeric columns. A negative significance implies digits to the left of the decimal. This is optional.ids: A list of columns to use as identifiers in the comparison. This signals to usecsvdiffto compare the files.csvdiffallows you to compare the semantic contents of two CSV files, ignoring things like row and column ordering in order to get to what's actually changed.1 Ifidsis not specified, a traditionaldiffis run, and the test output file must match the benchmark file exactly, i.e., the order of rows and columns must be the same. Also, ifidsis not specified, theignoreandsignificancefields are not used.
Note
The tests are run using a generic option which removes the datetime and other non-repeatable information from the logs.
To run a test suite, use:
vor test
To run a single test, use:
vor test -s <streamfile>
You can optionally specify a directory to store the diff output:
vor test --diff-output-dir <output-dir>
If a relative path is given, the directory is created within the playpen
directory. For each failed test with differences, the output file, benchmark
file (prefixed with bench_), and the diff (prefixed with diff_) are copied
into this specified directory.
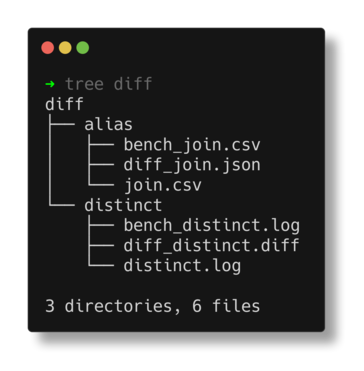
The example below shows the directory structure of the diff output directory
specified as diff for failed tests alias and distinct:
Here is an example of a tests.json file:
[
{
"streamfile": "baseball",
"logsToComp": [],
"ResultsToComp": [
{
"name": "output_bpf.csv",
"ids": [
"playerID",
"yearID",
"stint",
"teamID",
"lgID",
"G"
]
}
]
},
{
"streamfile": "distinct",
"logsToComp": [
"distinct"
],
"ResultsToComp": []
},
{
"streamfile": "orderby",
"logsToComp": [],
"ResultsToComp": [
{
"name": "test.csv",
"ids": [
"str",
"n1"
]
}
]
},
{
"streamfile": "cycle",
"logsToComp": [],
"ResultsToComp": [
{
"name": "results.csv",
"ids": [
"instid"
]
}
]
}
]
Model Unit Testing
Models registered with VOR Stream can be run individually for testing and validation purposes. Models can be run against user-provided data uploaded in the UI.
Setting up the model unit testing functionality involves registration of tables and creating stream files. This task takes place through the command line interface (CLI).
A separate stream file must be created for each model that uses different input data or is implemented in a different language (Python, Go, SAS). Here are the steps for setting up model unit testing:
- Create a stream file that has a type model.
- The first node should either read from a fixed-named input file or from var.model_unit. The output queue from this step needs to be defined to have the input fields expected by the model. Alternately, you could add the necessary ETL steps to create a queue that has the input fields expected by the model.
- Add a node that takes this input queue and calls the model. An example node for each language is shown below.
- Add an output node to direct the output to the desired location.
Ultimately, the model unit testing process could be as simple as:
name modelunit
type model
input var.model_unit -> modelinput
// this node evaluates a model
node testmod(modelinput)(modeloutput)
out modeloutput -> foo.csv
Or contain many more nodes for ETL processing the input data or post-processing the results of the model.
Node for Evaluating a Golang Model
For a Golang model, the node that evaluates a model will need the following imports to be added to the import statement:
"frg.com/streamr/sdk"
log
  "github.com/sirupsen/logrus"
and the following field added to the User structure:
model sdk.ModelS
The _init() function would look like:
func (u *User) _init() {
    var err error
    u.model, err = frgutil.GetModelUnitTest(u.hh)
    if err != nil {
        log.Errorln("could not retrieve or build model:", err)
        frgutil.EndJob(u.hh)
    }
}
The frgutil.GetModelUnitTest() function looks up the current
model being tested and builds the model. If the process is run from the CLI,
it uses the value of the tag modelunittestid in the
joboptions.json file to get the
model to build. If running from the CLI, the following vars
definition needs to be put in the joboptions.json file:
{
    "system": {
      "vars": {
            "MODEL_UNIT": "modtest.csv"
        },
      "modelunittestid": 55
    }
}
This is necessary to provide a default input for the model data.
The worker() function looks like:
func (u *User) worker(input *Modelinput.Modelinput) {
    err := frgutil.RunModelUnitTest(u.model, input, u.Modeloutput)
    if err != nil {
        log.Errorln("could not run the model:", err)
        frgutil.EndJob(u.hh)
    }
    Modeloutput.Post(u.Modeloutput)
}
The input and output queue names are determined by the stream file. The function frgutil.RunModelUnitTest() runs the model for the current observation specified in the input queue and writes the results to the output queue. Any input fields and model output variables that match the output queue names are copied to the output structure. This allows for control over, possibly, sensitive variables being output.
Here is an example entry in tables.csv for the modeloutput queue:
name,type,descr,inherit, groupkey
modeloutput,,Table describing model output variables including inputs if desired,modelinput,
pd
newOutput
forecast
date
icr_aus_z_l4
icr_aus_z_l8
gdp_aus_z_l1
gdp_aus_z_l2
score_actual
upper
lower
predict_rpt
segment
scenario
loss_value
Node for Evaluating a Python Model
Here is a sample stream file for model unit testing a Python model:
name modelunitpy
type model

input var.model_unit -> modelinput

node testmodpy(modelinput)(modeloutput) lang=python

out modeloutput -> modeloutput.csv
The Python node code for testmodpyU.py is as follows:
from sdk import framework
import logging
from frgutil import frgutil
from queues import Modelinput
from queues import Modeloutput

class testmodpy:
    options = dict()

    def __init__(self, handle, modeloutput):
        self.Modeloutput = modeloutput

        self.hh = handle
        if "processoptions" in handle.options["JobOptions"]:
            self.options = handle.options["JobOptions"]["processoptions"]
        else:
            self.options = None

        ## compile the model
        self.model = framework.ReadModelByID(
            self.hh.options["JobOptions"]["system"]["modelunittestid"]
        )
        if self.model == None:
            logging.error("Error compiling model ")
            self.hh.EndJob()
            return

    def worker(self, threadNum, input):
        # Convert the input to a dictionary
        obs = input.__dict__
        self.model.Model.model(obs)
        if len(self.model.output) > 0:
            self.Modeloutput.Post(Modeloutput.Modeloutput(**self.model.output))

    def term(self):
        return
The framework.ReadModelByID() function reads and compiles the specified model. To call the model in the worker function, the input class is converted into a dictionary and passed to the model. Evaluating the model assigns the results to the self.model.output field of the model class. The following line assigns the returned dictionary to the matching class variables in the output queue:
Modeloutput.Modeloutput(**self.model.output)
If the process is run from the CLI,
it uses the value of the tag modelunittestid in the
joboptions.json file to get the
model to build. If running from the CLI, the following vars
definition needs to be put in the joboptions.json file:
{
    "system": {
      "vars": {
            "MODEL_UNIT": "modtest.csv"
        },
      "modelunittestid": 55
    }
}
This is necessary to provide a default input for the model data.
Node for Evaluating a PMML Model
Here is an example stream file for a model unit test process for a PMML model:
name pmml
type model

input var.model_unit -> pmml

node testmodpmml(pmml)(pmmlout) lang=python

out pmmlout -> zscores.csv

subprocess pmml_report
This process follows a similar structure to a python model unit test file. This process has an additional step that creates a report for the results of the model evaluation.
The testmodpmmlU.py file is as follows:
import logging
from frgutil import frgutil
from sdk import framework_pb2, framework_pb2_grpc, sdk
import grpc
from queues import Pmml
from queues import Pmmlout
from pypmml import Model
import pypmml


class testmodpmml:
    options = dict()

    def __init__(self, handle, Pmmlout):
        self.Pmmlout = Pmmlout

        self.hh = handle
        if "processoptions" in handle.options["JobOptions"]:
            self.options = handle.options["JobOptions"]["processoptions"]
        else:
            self.options = None
        # perform one time initializations if necessary
        sdk_instance = sdk.Sdk()
        channel = sdk_instance.new_sdk_conn()

        stub = framework_pb2_grpc.ModelServiceStub(channel)
        model_id = self.hh.options["JobOptions"]["system"]["modelunittestid"]

        try:
            resp = stub.ReadModelByID(framework_pb2.ReadModelByIDInput(id=model_id))
            if resp is None or resp.model is None:
                logging.error("No PMML model found")
                return

        except grpc.RpcError as e:
            logging.error("ReadModel Error " + str(e))
            return

        if not _check_type(resp.model.script):
            logging.error(
                "Wrong type of model. Expecting PMML but got %s",
                resp.model.script[0].syntax,
            )
            return

        # compile the model
        try:
            self.model = Model.fromString(resp.model.script[0].code)
        except pypmml.PmmlError as e:
            logging.error("could not compile the PMML: " + str(e))
            return

        # check required vars
        self.modelmap = None

    def worker(self, threadNum, input):

        obs = input.__dict__

        # this setup is done just once - make names case insensitive
        if self.modelmap == None:
            self.modelmap = dict()
            for names in self.model.inputNames:
                n = names.lower()
                found = False
                for nn, v in obs.items():
                    nl = nn.lower()
                    if nl == n:
                        found = True
                        break
                if found:
                    self.modelmap[nn] = names
                else:
                    logging.warning(
                        "model input variable %s is not found in the input data", names
                    )

        # copy the input variables
        into = dict()
        for n, nn in self.modelmap.items():
            into[nn] = obs[n]

        result = self.model.predict(into)
        # make the result names Titled
        for n, nn in result.items():
            obs[n.capitalize()] = nn

        self.Pmmlout.Post(Pmmlout.Pmmlout(**obs))

    def term(self):
        return

# Verify the model is of the right type
def _check_type(script):
    if len(script) > 0:
        if script[0].syntax != "xml" and script[0].syntax.lower() != "pmml":
            logging.error(
                "requested model written in the wrong language expected 'pmml' but got '%s'",
                script[0].syntax,
            )
            return False
    else:
        logging.error("no model code provided")
        return False
    return True
This node is more complex than the Golang and Python examples because PMML is not directly supported by VOR Stream. The node code includes additional steps for validating and compiling the model, making explicit the steps for handling models based on other languages.
Node for Evaluating a SAS Model
The MODEL = option on a SAS node is used to select a model to inject into generated SAS code.
The syntax is:
MODEL = "model name" | _MODEL
SAS models can't have spaces in their names. If, instead of a model name, the _MODEL keyword was used, the model included in the SAS code would be the one specified in the model unit test or model performance run. Whichever way the model is selected, as long as the model exists, the following SAS macro and SAS macro variables will be created:
%let modelName=sampleSAS;
%macro sampleSAS_MODEL;
  ... model code
%mend sampleSAS_MODEL;
where sampleSAS is replaced with the actual model name.
The model can then be referenced using:
%&modelName._MODEL;
Use the following sasmod.strm stream file:
name sasmod
type model

input var.model_unit -> sasdata
sas sasdata  -> (ds = sasdata)
    (ds = sasout) -> sasout
    sasFile= "sasmod.sas"
    model = _model
    name=SASUnit

out sasout -> sasout.csv
and the following sasmod.sas file:
data sasdata;
%&modelName._Model;
run;
To run this process through the CLI, in the UI, note the modelID of the
desired SAS model. Edit the joboptions.json file and add this id with the tag
modelunittestid:
{
    "system": {
     "modelunittestid": 29,
    }
}